Validated by Amaya
Published: August 15, 2009
Updated: January 1, 2010 for Amaya compatibility
By Richard G.
Baldwin
Dark GDK Programming Notes # 102
In this lesson, I will teach you how to get started programming using Dark GDK and Visual C++ 2008 Express.
I recommend that you open another copy of this document in a separate browser window and use the following links to easily find and view the figures and listings while you are reading about them.
I recommend that you also study the other lessons in my extensive collection of online programming tutorials. You will find a consolidated index at www.DickBaldwin.com.
The Game Creators (http://gdk.thegamecreators.com) are now providing their flagship C++ game development package, Dark GDK, free of charge with Microsoft Visual C++ 2008 Express. You can download all of the necessary software at http://gdk.thegamecreators.com/?f=downloads
You will need to download the following files:
1) Microsoft's Visual C++ 2008 Express
2) August 2007 DirectX 9.0c SDK
3) Download Dark GDK (Click here for Microsoft download page)
You will also need to download and follow the installation guide.
Note that Dark GDK is very specific regarding the version of DirectX that is
installed on the machine (August
2007 DirectX 9.0c SDK). Somewhere I read that it won't work with any
other version.
It is necessary to install and run Visual C++ at least once before installing
Dark GDK. It is also necessary to install DirectX before installing Dark
GDK.
This lesson will get you started programming using Microsoft Visual C++ and Dark GDK. I will explain some of the basic operational aspects of using Dark GDK with Visual C++ express.
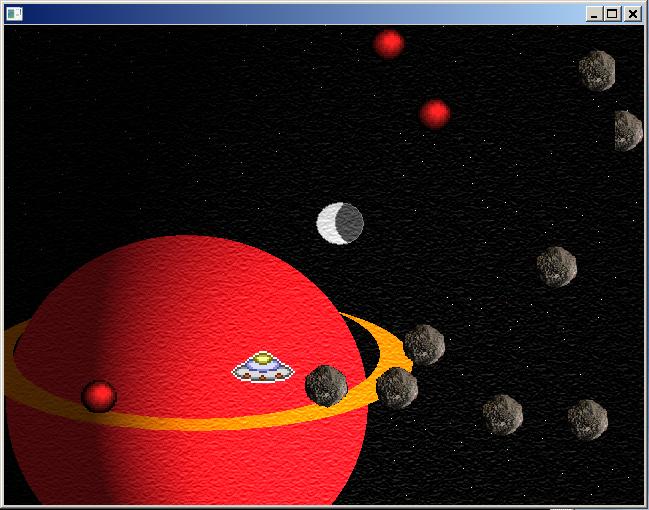
A screen shot of a Dark GDK asteroids game program is shown in Figure 1.
Figure 1. Screen shot of Dark GDK game program.| |
 |
Create a new game project
To create a new game project, select File/New/Project... to expose the dialog shown in Figure 3.
Figure 3. Dialog for a new project.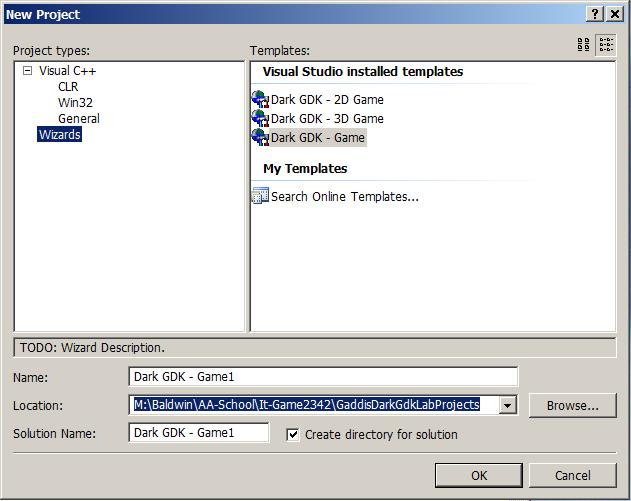 |
Select the game wizard
Select the game Wizard that is highlighted in Figure 3, specify a name and a location for the new project in the text fields at the bottom of the dialog, and click the OK button at the bottom of Figure 3. This should cause the left panel in the development screen to change to that shown in Figure 4.
Figure 4. Screen shot for a new game project.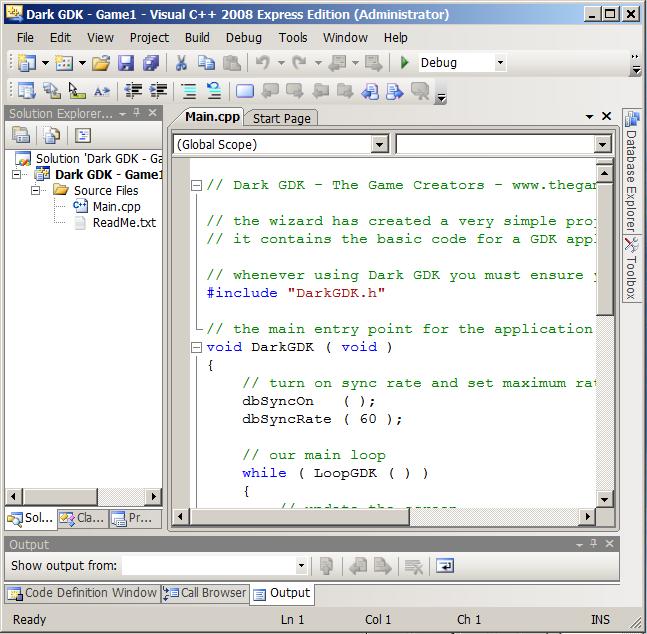 |
A source code template
Double-click the item titled Main.cpp in the left panel and the source code template shown in the right panel should appear. This source code template contains all of the main elements required for writing a game program in Dark GDK. I will discuss these elements in more detail in the paragraphs that follow.
The new project folder
Clicking the OK button at the bottom of Figure 3 will also cause a project folder to be created at the specified location with the specified name on your hard drive. This folder is the root of a project directory tree as shown in Figure 5 and Figure 6.
Figure 5. The project directory tree - view 1. |
Figure 6. The project directory tree - view 2.
 |
Later when you build your project, additional files and folders will be added to the tree.
Opening an existing project
The easiest way to open an existing project is to double-click on the file with the .sln extension in Figure 5. You can also open that file from the File menu in Figure 2.
Where do you put the resource files?
Typically you will need to use a variety of image files, sound files, and other resource files when you write a game program. Although there are other ways to accomplish this, the easiest way is to copy those resource files into the folder at the level shown in Figure 6. That will eliminate the need to specify a path to the resource files in the program code.
The game program template
A complete listing of the game program template is shown in Listing 5 near the end of the lesson. I will explain the major elements in that template in the paragraphs and code fragments that follow.
A required header file
Whenever you use Dark GDK to write a game program, you must include the header file shown in Listing 1.
Listing 1. The required DarkGDK header file.#include "DarkGDK.h" |
If you attempt to build your game project and you get an error message indicating that this header file can't be found, you need to go back and review the installation guide. If Dark GDK is properly installed along with Visual C++ Express, the syntax shown in Listing 1 should be sufficient to cause the header file to be found and included in your project.
The main entry point for the game program
The function named DarkGDK, which begins in Listing 2, is the main entry point for the game portion of the program.
Listing 2. The main entry point.void DarkGDK ( void )
{
dbSyncOn ( );
dbSyncRate ( 60 );
|
Apparently the main function, which is the main entry point for all C++ programs, is created automatically when you build your project. In any event, you don't need to worry about it, and the function named DarkGDK will be called automatically when you execute your program.
Controlling the screen refresh rate
In a typical a game program, particularly one involving animation, you will want to control when and how often the screen is refreshed. This is accomplished by the two statements shown in Listing 2 plus one additional statement that I will highlight later.
Description of the dbSyncOn function
Dark GDK consists of a large library of C++ functions that can be called by your program to accomplish a variety of tasks. Figure 7 shows the description (taken from the Dark GDK documentation) for the function named dbSyncOn.
Figure 7. Description of the dbSyncOn function.| dbSyncOn This command is used to improve the performance of demanding programs that require a consistent frame rate. This is especially true of games. By default, sync is set to off which allows the system to automatically handle screen refreshing. When dbSyncOn is used, your program is responsible for handling screen refreshing. You can refresh the screen using the dbSync command. When you want the system to automatically handle screen refreshing again, you can use the dbSyncOff command. By placing the dbSync command at the end of your main program loop, all drawing and refresh tasks can occur in a single call. This dramatically increases the speed and smoothness of graphical operations, allowing your programs to run at their best. |
In brief, a call to the dbSyncOn function notifies the operating system that your program will be responsible for causing the program screen to be refreshed. The dbSyncOn function is called by the first statement in Listing 2.
Where is the documentation?
If you have Dark GDK installed on your machine, you will find the documentation in the file shown in Figure 8 where <Installation Folder> is the folder where you installed Dark GDK.
Figure 8. Location of Dark GDK documentation.| The documentation can be found in the following file
<Installation Folder>\The Game Creators\Dark GDK\Documentation\Dark GDK.chm |
If you double click on the file named Dark GDK.chm, it should open in your default browser.
Description of the dbSyncRate function
The second statement in Listing 2 calls the function named dbSyncRate. The description of this function is shown in Figure 9.
Figure 9. Description of the dbSyncRate function.| dbSyncRate This command is used to change the default refresh rate dbSyncOn uses to control the speed of the dbSync update speed. The default rate sustains the 'Frames Per Second' at no more than 40fps. You can specify an integer value from 1 to 1000 to set a new maximum rate. A rate of zero will allow the program to refresh as fast as the system will allow. A forced sync rate cannot produce an accurate rating as in order to
keep the refresh smooth, the code can only work with milliseconds which
is not an accurate method of timing. The system is designed to treat
smoothness more important than frame rating accuracy. |
In short, the dbSyncRate function sets the maximum refresh rate to the value passed as a parameter.
The main game loop
The main game loop is shown in Listing 3.
Listing 3. The main game loop. while ( LoopGDK ( ) )
{
// update the screen
dbSync ( );
}//end while loop
|
As mentioned in Figure 7, "You can refresh the screen using the dbSync command." In most cases, you should call the dbSync function at the end of the main game loop. This is the third statement used for controlling the refresh rate that I mentioned earlier.
Place code in the game loop
You should place the code that is to be executed during each iteration of the game loop ahead of the call to the dbSync function. Of course that code can instantiate objects, destroy objects, and call functions whose definitions are located outside the DarkGDK function. (You may need to provide function prototypes to make them accessible.)
Iterate while the LoopGDK function returns true
The loop shown in Listing 3 will continue to iterate for as long as the LoopGDK function returns true (any nonzero value in C++ is interpreted as true). Figure 10 contains a description of the LoopGDK function according to Gaddis.
Figure 10. The LoopGDK function according to Gaddis.| LoopGDK -- This function is used to control the number of times that a loop executes per second. It also tells us, via its return value, whether the user has attempted to end the program. It returns zero if the user has closed the program's window, or pressed theEsc key. Otherwise it returns a nonzero value. |
Therefore, your program, which is coded into the main game loop, will continue to execute until the player closes the window in which the game is running or presses the Esc key.
The end of the DarkGDK function
Listing 4 simply ends the DarkGDK function by returning control to Windows.
Listing 4. End the DarkGDK function.// return back to windows return; }//end DarkGDK function |
Building and running your Dark GDK program
There are several ways to build the project and execute the program from within the Visual C++ programming environment. The easiest is to press Ctrl-F5. This is equivalent to selecting the third item from the Debug menu shown in Figure 11.
Figure 11. Building and running your Dark GDK program. |
Status information during the build process
Status information is displayed in a panel at the bottom of the Visual C++ programming environment during the build process. If there are errors, they will be displayed in that panel. If there are no errors, the last line of text in that panel will be similar to the following:
===== Build: 1 succeeded, 0 failed, 0 up-to-date, 0 skipped =====
If there are no errors...
If there are no errors, a window similar to that shown in Figure 1 will appear on the screen exhibiting the behavior that you have coded into the Dark GDK function. (If you build and run the template program, it will simply cause a black window to appear on the screen.)
The Debug project folder
When you successfully build your project, a new Debug folder will be added to your project's directory tree as shown in Figure 12.
Figure 12. The project's Debug folder.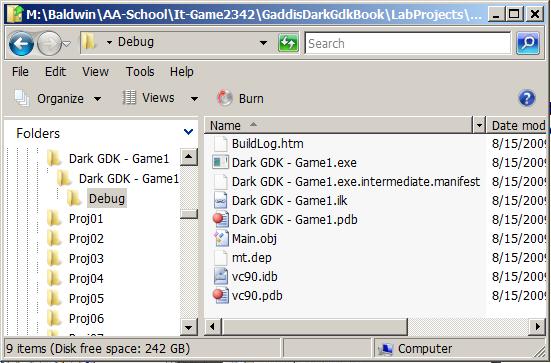 |
The executable exe file
As you can see in Figure 12, the Debug folder will contain several files . The most interesting file is the one with the exe extension. From this point forward, you can execute the program simply by double-clicking that file name. (As is typically the case, you can also execute the program by entering the name of the program on the command line.)
Resource files
If you program uses image files, sound files, or other resource files, you must place copies of those files in the Debug folder along with the executable file in order for the program to find them during execution.
The portable version of the program
The exe file is also the portable version of the program. You should be able to copy that file, along with copies of the required resource files, into a folder on another Windows computer and execute the program on that computer provided that the correct version of DirectX (August 2007 DirectX 9.0c SDK) is installed on that computer. (There should be no requirement to have Visual C++ Express or the Dark GDK library installed on that computer.)
Now it's your turn
At this point, you should be able to take what you have learned above and write a simple program involving Dark GDK and Visual C++.
I encourage you to copy the source code from Listing 5, build a project using that source code, and execute it. Experiment with the code, making changes, and observing the results of your changes. Make certain that you can explain why your changes behave as they do.
In this lesson, I showed you most of what you need to know to get started writing programs using Dark GDK and Visual C++ 2008 Express.
// Dark GDK - The Game Creators - www.thegamecreators.com
// the wizard has created a very simple project that uses Dark GDK
// it contains the basic code for a GDK application
// whenever using Dark GDK you must ensure you include the header file
#include "DarkGDK.h"
// the main entry point for the application is this function
void DarkGDK ( void )
{
// turn on sync rate and set maximum rate to 60 fps
dbSyncOn ( );
dbSyncRate ( 60 );
// our main loop
	while ( LoopGDK ( ) )
	{
		// update the screen
		dbSync ( );
	}//end while loop
	// return back to windows
	return;
}//end DarkGDK function
|
Copyright 2009, Richard G. Baldwin. Reproduction in whole or in part in any form or medium without express written permission from Richard Baldwin is prohibited.
Richard has participated in numerous consulting projects and he frequently provides onsite training at the high-tech companies located in and around Austin, Texas. He is the author of Baldwin's Programming Tutorials, which have gained a worldwide following among experienced and aspiring programmers. He has also published articles in JavaPro magazine.
In addition to his programming expertise, Richard has many years of practical experience in Digital Signal Processing (DSP). His first job after he earned his Bachelor's degree was doing DSP in the Seismic Research Department of Texas Instruments. (TI is still a world leader in DSP.) In the following years, he applied his programming and DSP expertise to other interesting areas including sonar and underwater acoustics.
Richard holds an MSEE degree from Southern Methodist University and has many years of experience in the application of computer technology to real-world problems.
-end-