PHYS 1407 – Conceptual Physics II
Ohm’s Law
Leader: ___________________ Recorder: __________________________
Skeptic: ___________________ Encourager: ________________________
Materials
2 x DMM
2x alligator clips
Analog Ammeter
Laptop (for graph)
Introduction
In this activity we will examine the factors that determine the amount of current that flows in a resistive circuit. Part 1 will examine the correct use of meters. Part 2 will look at the relationship between potential difference and current for conductor’s called Ohm’s law.
Part
1 Use of Voltmeters and Ammeters
In
the following procedure, disconnect your circuits when not making observations
to preserve battery life.
Use
the

Observe the bright ness of the light bulbs, and open
the circuit.
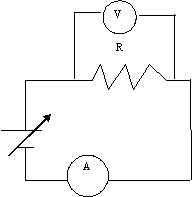
When we
depict a meter on a schematic we show it by a circle with a letter inside
designating the type of meter. Thus a
voltmeter will be a circle with a V inside and an ammeter will be a circle with
an A inside. Potential differences are
measured across objects so when using a voltmeter – or a DMM in voltmeter
setting – we place the probes on either side of the object.
Q1) Close the
circuit and use the DMM to measure the potential difference across each
resistor and record the values. Both
values should be positive so reverse the orientation of the leads if you
measure a negative value. V1
= ________ V2 = __________
Q2) Find the
sum of the potential differences
V = V1 + V2 = _______
Q3) Measure
the potential difference across both resistors and record
V = ________
Q4) How does
your answer to Q3) compare to Q2)? Explain why this should be the case.
Q5) Measure
the potential difference across the battery and record
V = _______
Open the circuit again.
Q6) How does
your answer to Q5) compare to Q2)? Explain why this should be the case.
Now we will find out what happens when we connect a
voltmeter incorrectly. Instead of using
the voltmeter across a resistor, let us connect it in series with the
circuit. Connect the following circuit.
Note to put a new element in series, you must make a break in the current
circuit.

Q7) What
happens to the light bulbs when you place the voltmeter in series with the
circuit?
Q8) Does this
suggest that a voltmeter has a high resistance or a low resistance? Explain.
Now we
will examine using an ammeter. Current
flows through a circuit so to measure it, the current must flow through the
ammeter. Thus when we use an ammeter
correctly it must be placed in series in the circuit.
Remove
the voltmeter from the circuit and reconnect the battery across the two light
bulbs in series. Take a piece of
alligator clip wire and short out one of the light bulbs by connecting the wire
form one side of the socket to the other.
Q9) What
happens to the other light bulb?
Q10) Did the
current increase or decrease when the first light bulb was shorted out?
Disconnect the short circuit.
Now we will use an ammeter incorrectly and see what
happens. It is very common for people to
connect an ammeter like it was a voltmeter, namely to connect it across a
circuit element instead of putting it in series with the circuit. Clip one alligator clip lead onto the black
common terminal on the ammeter and the other onto the 5 A terminal. This means that the ammeter will read 0 – 5
A. If the lead was connected to the 500 mA terminal it would read 0 – 500 mA
and so on. Connect the ammeter across
one of the light bulbs and observe what happens. Disconnect once you have made your
observation.
Q11) Describe
what happens. Did you short out the
light bulb?
When you connect an ammeter across a circuit
element, you create a short circuit and increase the current in the
circuit. This can be dangerous and at
the very least can damage the ammeter.
Ammeters must be connected in series with the circuit.
Connect the ammeter in series with the light bulbs
between the positive terminal of the battery and the first light bulb.
Q12) Are both
light bulbs now lit?
Q13) Record
the current. Note if the needle seems to
be deflecting to the left, reverse the leads.
P14) Does it
matter where in the circuit you place the ammeter? Explain.
Connect the ammeter so that it is in series between
the two light bulbs.
Q15) Record
the current.
Q16) How does
the current recorded in Q15) compare the
current recorded in Q14)?
Connect the ammeter in series so that it is between
the light bulb and the – terminal of the battery.
Q17) Record
the current.
Q18) How does
the current recorded in Q) compare the
currents recorded in Q15) and Q14)?
Q19) What
does your answer to Q18) suggest about
the behavior of current in a series circuit?
Part 2 Ohm’s Law
Procedure
1. Set-Up
Place
the 100 Ω resistor between empty coils on the
.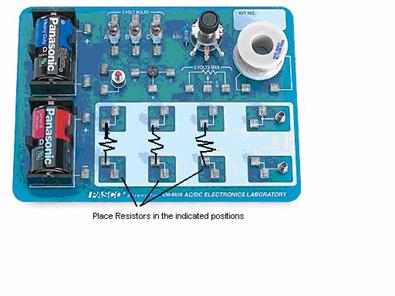 Make
sure that the power supply is turned off.
Configure a second DMM to be used as an ammeter by plugging one lead
into COM and the other into the socket marked 2 A. Connect the ammeter in series with the
resistor and the other DMM configured as a voltmeter across the resistor. This way we will measure the potential across
the resistor and the current through it.
Before turning on the power supply,
check your circuit with the instructor.
Incorrect circuits will result in blown fuses and possible damage to the
DMM.
Make
sure that the power supply is turned off.
Configure a second DMM to be used as an ammeter by plugging one lead
into COM and the other into the socket marked 2 A. Connect the ammeter in series with the
resistor and the other DMM configured as a voltmeter across the resistor. This way we will measure the potential across
the resistor and the current through it.
Before turning on the power supply,
check your circuit with the instructor.
Incorrect circuits will result in blown fuses and possible damage to the
DMM.
2. Using the lowest 5 settings on the power supply, collect and record Potential Difference versus current data for the 100 Ω resistor.
D20) Record your data in the table below.
3. Reverse the leads to the power supply only, so that you apply a negative potential difference across the circuit. Measure and record Potential Difference (in V) versus Current (in A) in your data table for the lowest 5 settings on the power supply.
D21) Add this data to your table.
|
Current (A) |
Potential Difference (V) |
|
|
|
|
|
|
|
|
|
|
|
|
|
|
|
|
0 |
0 |
|
|
|
|
|
|
|
|
|
|
|
|
|
|
|
Data Analysis
Using your data for both positive and negative potential differences, construct a graph of Voltage versus Current for with LoggerPro. (Remember it is y vs. x)
Q22) Do your data seem to lie along a line?
Q23) Does the line seem to go through the origin? (Or at least very close?)
Q24) What type of relationship is represented by a line that goes through the origin?
D25)
Click on the linear regression button ![]() . LoggerPro will use
a statistical procedure and find the line which most closely matches the data –
referred to as a best fit line.
. LoggerPro will use
a statistical procedure and find the line which most closely matches the data –
referred to as a best fit line.
Print and attach your graph.
Q26) How does the slope of the line compare to the resistance of the resistor.
Q27) Fill in the blank with the appropriate type of mathematical relationship. For a resistor, the potential difference is ______ to the current.
This idea is Ohm’s law.