Quick Start Guide to Acquiring and
Analyzing Video Data with LoggerPro
I. Connecting the Camera to the Computer
1. Boot the Computer. The user ID for the NRG computers is student. Leave the password blank.
2. Make sure that the cameras have power, either a fresh battery pack or the DC adapter. Connect the camera to the computer with the Firewire (IEEE 1394) cable, open the LCD monitor on the side of the camera and turn on the camera. On the DR700’s turn the switch to the Camera position.
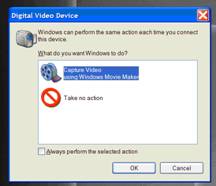
3. Once the camera is turned on, Windows will detect it. Click cancel on the box similar to the one below that appears once Windows detects the camera and you’re ready to go.
II. Set the Shutter Speed
1. Make sure that the slider switches on top of the camera are in the P position and in the tape position..
2. Press the Func. Button beneath the view screen.
3. Use the control on the left beneath the view screen to highlight menu. Gently push in the control to select.
4. Higlight Camera Setup and push the control to select.
5. Highlight Shutter Speed and push the control to select.
6. Higlight 1/500 and push the control to select.
7. Push the Func. button again to exit.
III. Acquiring Video Data with LoggerPro
1. Double Click on
the LoggerPro icon ![]() to launch LoggerPro.
to launch LoggerPro.
2. Click on the Insert menu and then click on Video Capture …. Provided Windows has successfully detected the camera, a box similar to the following will appear.
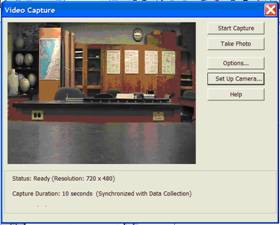
3. LoggerPro defaults to acquiring data for 10 s. You can change the data collection time by clicking on the Options… button. To start video capture, click on the Start Capture button. Once data acquisition starts, the Start Capture turns into a Stop Capture button. Click on the Stop Capture button once you have finished the data collection. You can let LoggerPro stop the collection automatically but that will tend to make large video files with a lot of superfluous frames, so it’s a good idea to synch the data capture closely to the event being filmed.
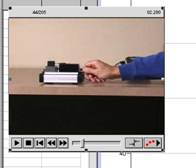
4. Once you stop
video capture the recorded video will open as a new window in LoggerPro,
similar to that shown below. You use
this new window to play back and analyze the video. The playback controls are at the bottom left
of the window and are the typical digital video type buttons – play ![]() ,
stop
,
stop ![]() ,
return to first frame
,
return to first frame ![]() ,
advance single frame
,
advance single frame ![]() ,
reverse single frame
,
reverse single frame ![]() ,
as well as a slider
,
as well as a slider ![]() . You click and drag on the slider to position
the video at the desired frame.
. You click and drag on the slider to position
the video at the desired frame.
5. The Video Capture window tends to get in the way of analyzing the data so click on the red X in the upper right corner of that window to close it.
6. Fast moving objects often appear blurry or sometimes as double objects in video data. This is in part due to the video being interlaced – meaning that only half the frame is updated each time. Generally you want to deinterlace the video by right clicking on the window, choosing Movie Options…, and then checking the Deinterlace Movie box.
IV. Analyzing Video Data
1. To begin analyzing video data, you click on the Enable/Disable Video Analysis toggle ![]() . The window will now have video analysis tools
on the right as shown in the figure below.
Either use the frame advance double arrows or
the slider to position the clip at the first frame you want to analyze.
. The window will now have video analysis tools
on the right as shown in the figure below.
Either use the frame advance double arrows or
the slider to position the clip at the first frame you want to analyze.

2. Choose an
identifiable point on the object. Click on
the Add Point button
![]() . Click on the object and a dot will be shown
where the object was, and the video will automatically advance one frame.
Continue clicking on the object until you have clicked on all the frames you
wish to analyze.
. Click on the object and a dot will be shown
where the object was, and the video will automatically advance one frame.
Continue clicking on the object until you have clicked on all the frames you
wish to analyze.
3. Sometimes the
trail of dots can get in the way of clicking on the object. The trail can be
turned on or off by clicking on the Toggle
Trails button ![]() .
.
4. If you clicked on
a the object badly or added a stray point, you can edit the points by clicking
on the Select Point button ![]() . Clicking on a point will move the video to
that frame. The point can be dragged to
a more accurate position or can be deleted by right clicking and choosing
delete.
. Clicking on a point will move the video to
that frame. The point can be dragged to
a more accurate position or can be deleted by right clicking and choosing
delete.
V. Setting the Scale
1. Video data
analysis defaults to distances measured in pixels. To convert to meters you need to mark an
object of known length. Click on the Set Scale button ![]() . Place the cursor at one end of the object of
known length and click and drag to the other end. Once you release the mouse button a box will
appear in which you can enter the length of the object. If you incorrectly marked the object, click
on cancel and repeat.
. Place the cursor at one end of the object of
known length and click and drag to the other end. Once you release the mouse button a box will
appear in which you can enter the length of the object. If you incorrectly marked the object, click
on cancel and repeat.
2. If you want to
look at how the scale is set you can click on the Show Scale button ![]() .
.
VI. Adjusting the Coordinate System
1. The default
coordinate systems is that the x-axis is horizontal,
the y-axis is vertical and the origin is at the lower left corner of the
window. You can see the current origin
by clicking on the Show Origin button ![]() . The axis are shown
in yellow.
. The axis are shown
in yellow.
2. You can adjust the
coordinate system by clicking on the Set
Origin button ![]() . You can change the location of the origin by
clicking and dragging near the origin, or alternatively you can place the
cursor at the position you want to have the origin and then click. The origin will move to that position.
. You can change the location of the origin by
clicking and dragging near the origin, or alternatively you can place the
cursor at the position you want to have the origin and then click. The origin will move to that position.
3. You can also rotate the coordinate system. There is a yellow dot on the x-axis. If you click on (or near) the dot and then drag, the coordinate system will rotate.
VII. Analyzing Data with more than One Object
1. In collisions you will want to analyze video with more than one object. LoggerPro will allow you to analyze up to three objects. It seems that the easiest way to analyze multiple objects in LoggerPro is to mark the position of each object completely before going on to the next. So if analyzing a collision, analyze the motion for the first object. Then return the video to the first frame analyzed, add a new data series and analyze the motion for the second object.
2. To add a new data
series to analyze the motion of a second object click on the Set Active Point button
![]() ,
and then click on Add Point Series. The
new series will default to the active series and you can analyze the motion of
the new object.
,
and then click on Add Point Series. The
new series will default to the active series and you can analyze the motion of
the new object.
3. If you have more than one series, you can set the active series by clicking on the Set Active Point Button and then clicking on the desired series. The data analysis tools will apply to whichever series is currently active.
VIII. Synchronizing Video
Data with Data from Probes
1. Set up LoggerPro to take data as normal using probes. Set up the experiment so that there is some sort of marker event so that you can synchronize the video data and the probe data.
2. Insert Video Capture … as above. Click on the Options button and choose the option to take video with data collection. When you click on Start Capture LoggerPro will take both video data and probe data.
3. Synchronize the
data by clicking on the Sync Movie to
Graph button ![]() which will open a window similar to the
following.
which will open a window similar to the
following.
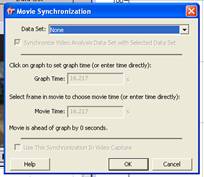
Click on the graph of the data at the time the synchronizing event occurred and then advance the movie clip to that frame and click OK. The data from the probe and movie will now have the same time axis.
4. Once you have analyzed the video data, a neat thing to do is replay the experiment. Click on the Analyze menu and then choose Replay Latest. A box similar to the one shown below will appear.
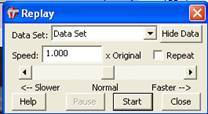
You can adjust the replay speed and when you click on start it will show the video again, while showing the corresponding data in the graphs.