Web Page Design I - Online Fireworks Tutorial - Part 1, Step 3 |
David Correa Instructor's Portal |
11/25/03 Step 3: Fireworks MX exercise. In this part we will look at slicing and exporting. Follow the steps using the graphics you created in step two.
|
|
1. Alright, if you are on Frame one you're ready to start Slicing the image. Slicing does two things. First of all (we will Sclice along the guides we set in place in Step two) each Slice represents an image in a table yet to be created. An image will be created that matches the size of the Slice. Secondly, the Slices represent cells in a table which will be generated when you go through the export preview steps later. So Fireworks MX will generate an HTML document (because we will ask it to) and on that docuement there will be a table that will hold all the images defined by our Slices. Okay click on the Slice tool. |
|
 |
|
2. Drag out Slices that divide up your interface/web page similar to the way I did mine. We could take the time to name each Slice right now but we won't. |
|
 |
|
3. Above the word EMPLOYMENT I drug out a Slice that is 3 pixels high and the width of the document. Save your work! |
|
 |
|
| 4. I went ahead and "named" the Slice over the Logo so you could see how it looks in the Property Inspector. | |
 |
|
| 5. Using the shift key, select all the Slices over the buttons. In the Behavors panel click on the plus sign and select Simple Rollover. This will attach and create all the necessary JavaScript code simultaneously to all the buttons that will make them react when you Rollover them. You can test this out by clicking the Preiew tab at the top of the document window and rolling over the buttons. Don't forget to go back to the Original tab before continuing the tutorial. | |
 |
|
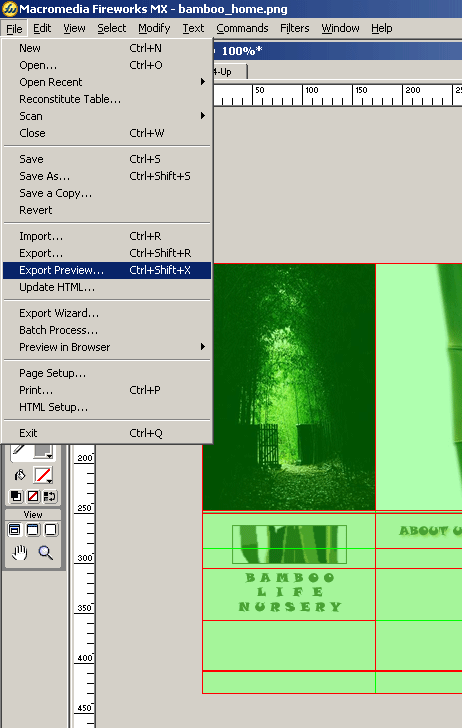
| 6. Now we are 'ready enough' to export our files. Go to File>Export Preview. | |
 |
|
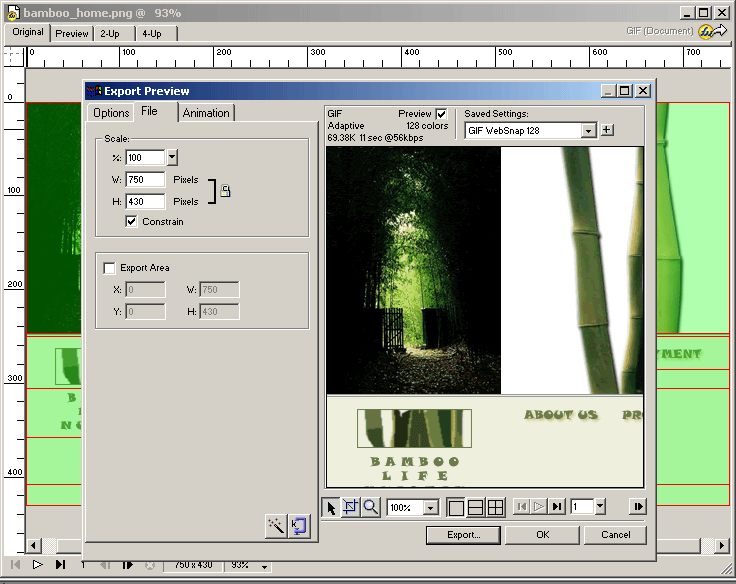
| 7. In the next window that pops up you can adjust color settings, change between GIF and JPEG, and make backgrounds transparent. I will export my images as Gif's. Now click Export. | |
 |
|
7. Browse/navigate to your root folder and open it up. My sample page will be called bamboo_home.html. Yours might be called index.html. Change your settings to match what you see in this image below. You will be exporting images and HTML. If you did not create an image folder in your Root folder already, you will have to ask Fireworks to create an image folder and then place all the image pieces in it. Click Save. |
|
 |
|
| 8. Just a side note. You can also adjust the table in the Table tab. My table will have a 1-Pixel Transparent Spacer. Click Okay. | |
 |
|
| 9. Back in the main export window click Save. | |
 |
|
11. That's it Fireworks just cut your image into all the pieces you defined with the slicing and placed them into the image folder in your root folder. This step is so much easier than creating all the separate pieces in Photoshop. 12. Now at this point you should be able to (find it in the Root folder) click on bamboo_home.html and see the completed page in the browser. |
|
| Okay, that's it for the slicing portion of the Tutorial. Let's move on to the next page to look at creating a background image for our page. | |