Lesson 1 – Drawing in Flash
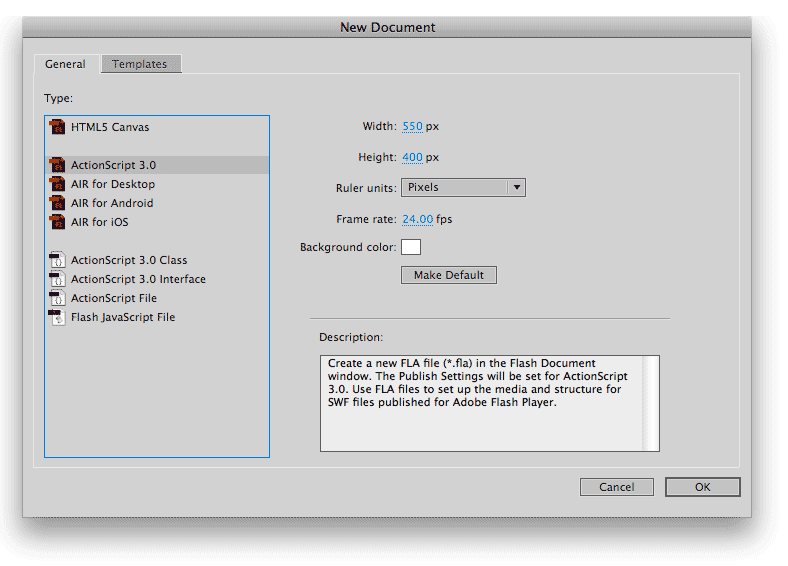
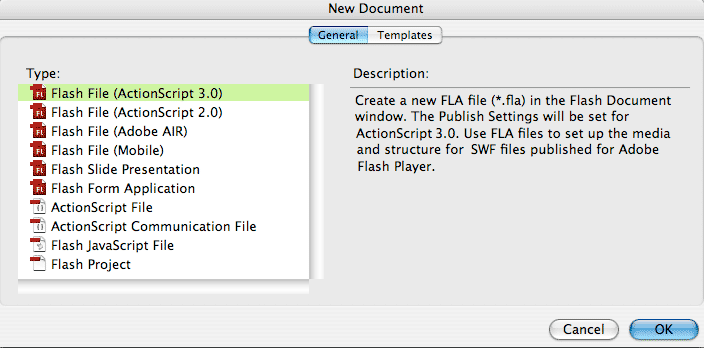
As mentioned, Flash can create several types of documents. To start a new Flash exercise, select FILE > New... and leave the default filetype selected {Flash File (ActionScript 3.0)}:
The New Document Dialog in CC:
The New Document dialog in CS6:
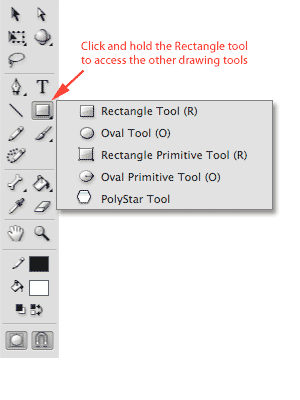
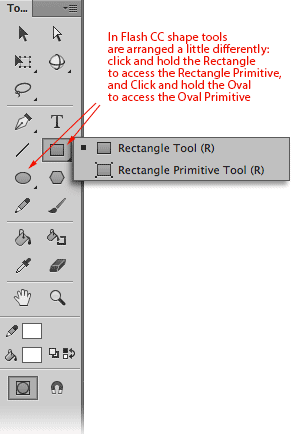
Flash has drawing tools similar to those in popular programs like Adobe Illustrator, Fireworks, and Photoshop:
![]() There are two drawing modes in Flash: Object Drawing and Normal. Object drawing mode is enabled when the circular icon pictured to the left is darker grey (in the image to the left it IS NOT enabled; in the image of the toolbox above it IS enabled). You can only see this icon when a shape-creating tool such as the Brush, Pencil, Line, or any of the Shape tools called out above is selected. In Normal mode, shapes automatically segment as soon as you draw them (e.g. the strokes become separate pieces of art than the fills):
There are two drawing modes in Flash: Object Drawing and Normal. Object drawing mode is enabled when the circular icon pictured to the left is darker grey (in the image to the left it IS NOT enabled; in the image of the toolbox above it IS enabled). You can only see this icon when a shape-creating tool such as the Brush, Pencil, Line, or any of the Shape tools called out above is selected. In Normal mode, shapes automatically segment as soon as you draw them (e.g. the strokes become separate pieces of art than the fills):
The black square of color pictured in the toolbox above next to the pencil icon is the Stroke color of the next shape to be drawn (you can change it by clicking it and choosing another color). Stroke = outline. The white square next to the bucket icon is the Fill color of the next shape to be drawn. It's best to set these colors before using a drawing tool.
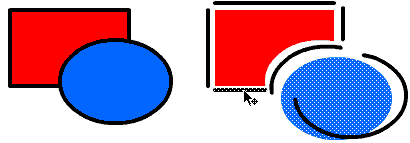
If you draw one shape overlapping another, the hidden area gets eliminated (see the chunk missing from the red fill above right). You can select fills and strokes separately, using the Select tool (the black arrow at the top of the Toolbox). When a fill or a stroke is selected, it displays a dotted white pattern. (FYI: you will never use the Subselect tool—the white arrow—in this class; it is for precision manipulation of shapes. Always use the Selection—black arrow— to select objects.)
This automatic segmenting can be inconvenient (especially if you're used to drawing programs which do not work this way) it's often advantageous, as in the case of drawing a crescent moon:
In Object Drawing mode, this segmenting does not happen, and shapes remain intact even when they overlap.
Drawing Objects have a "depth" attribute, allowing them to stack. Shapes (non-drawing objects) do not have depth, so when they overlap they merge (Photoshop users can relate this to painting on the Background vs. painting on a Layer). Drawing object depth is assigned automatically (later objects overlap earlier drawn objects), but you can change a Drawing Object's depth by selecing it and choosing MODIFY > Arrange >Send to back / Bring to front).
Object Drawing mode is not a tool-specific option; when enabled, it remains active for all drawing tools. You can only see the Object Drawing button on the Toolbox when you have a shape-creating tool selected (the Line tool, Brush, Pencil, or the basic shape tools)
Editing shapes
If you forget to change the fill or stroke color of the shape
before you draw it (by setting these options on the Toolbox), you can change the
stroke of any shape by clicking it with the Ink Bottle tool ![]() NOTE: in Flash CC the Ink Bottle tool icon is different:
NOTE: in Flash CC the Ink Bottle tool icon is different: ![]() ,
and change the Fill of a shape by clicking it with the Paint Bucket tool
,
and change the Fill of a shape by clicking it with the Paint Bucket tool ![]() . (In Flash CS6 the Ink Bottle tool shares the same tool slot as the Paint Bucket; hold down on the Paint Bucket to access the Ink Bottle, and vice versa). Note that the tiny icons next to the color squares on the Toolbox are NOT tools: clicking the bucket icon is not the same as clicking the Bucket tool!
. (In Flash CS6 the Ink Bottle tool shares the same tool slot as the Paint Bucket; hold down on the Paint Bucket to access the Ink Bottle, and vice versa). Note that the tiny icons next to the color squares on the Toolbox are NOT tools: clicking the bucket icon is not the same as clicking the Bucket tool!
You can reshape objects with the Selection tool (the black arrow), by placing the cursor next to the unselected object, and watching for a "J" shaped icon to appear beside the cursor (indicating you are reshaping a curve), or a backwards "L" (indicating you are moving a corner point). The shape must NOT be selected when you try to reshape it (de-select by clicking the white stage).
(use the numbers in the active tab at the top of the page to navigate this lesson)