

| Board of Trustees • President • Human Resources • Business Services • Organizational Reference |
ACCeTime |
| Webmail • Schedule • Login |
|
Lara Niles Austin Community College 5930 Middle Fiskville Rd. Austin, Texas 78752-4390 512.223.7784 |
ACCeTime |
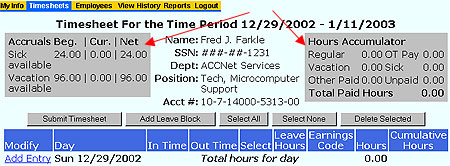
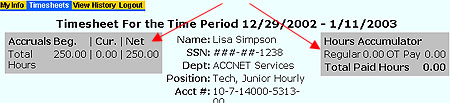
Modify a TimesheetUnder the Timesheet Tab, click on your position title to access your timesheet. At this point, you can create new entries. Note: If you do not need to report any absences for the month, you may simply click Submit Timesheet to complete the process. Summary BoxesWhen you open a timesheet, you will see two gray summary boxes at the top. Classified Employees
Hourly Employees
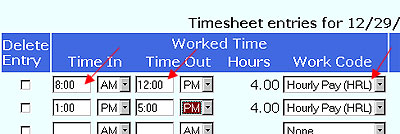
Important: OT Pay (overtime pay) is calculated by the system after you submit your timesheet. Add Hours WorkedFind the first date on the timesheet that you worked (for example, the first Monday). Click Add Entry next to that date.
Hourly employees will have one column for hours worked. Classifieds will have two columns and should use the column on the left for hours worked.
1. Enter the time you came in and the time you left as shown in the example above. Be sure to indicate am or pm. The system will add your hours for you. 2. Next, indicate your type of pay (for example, hourly, bi-weekly for classifieds, work study, etc.). 3. Click the Save button at the bottom of your screen to save your entries and return to the main timesheet. Classified Only: Add Leave TimeClassified employees must use the column on the right to add leave time. You may add only one entry per horizontal line. For example, if you worked in the morning and were out in the afternoon as shown in the example below, you would use two separate lines. That is, each row must show either work time or leave time, but not both. To add leave time, enter the number of hours you were out and indicate a valid leave code from the drop down menu. Be sure to click the Save button at the bottom of the screen to save your entries.
Edit or Delete an EntryWork time and leave time (for classifieds) are indicated on your timesheet. At any point during the pay period, you can delete the entry by clicking the select box and Delete. Alternatively, you can edit the entry by clicking Edit. You will be able to change the date, number of hours, or type of leave.
Note: The Select boxes are used to select one or more entries for deleting. You can select specific entries to delete by clicking on these boxes. Alternatively, you can use the Select All and Select None buttons. Classified Only: Add a Leave BlockIf you are absent for consecutive days with the same type of leave, click the Add Leave Block button as shown above. Type the first and last day of leave, number of hours, and type of leave. Click Save and you will be prompted to confirm the new entries. Note: Your saved entries will remain each time you log out and close your browser. At any point during the pay period, you can add, edit, or delete entries. You timesheet is not official until you submit it to your supervisor. Next: Submit Timesheet |


Last modified: October 20 2008 @ 3:16 pm | Austin Community College District • Austin, TX