Lesson 2—Animation
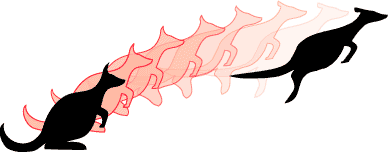
In the days before computers, animation was done frame-by-frame. The lead artists would illustrate every key moment in an animation (called "keyframes"), and pass them to junior artists who would illustrate the "in-between" frames. The process of generating transitional frames is still known as "tweening" but—thank goodness—computers do the tedious work.

The frame rate—the number of images displayed in succession per second—determines the smoothness of perceived motion. Higher frame rates yield more fluid motion. TV displays at almost 30 frames per second (fps), while motion pictures display at 24fps (the default frame rate in Flash is 24fps).
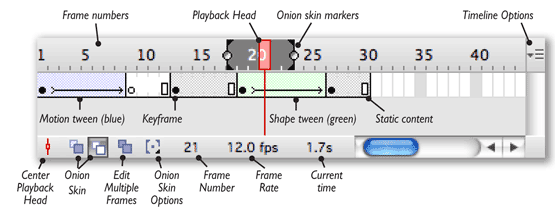
Animation is controlled with the Timeline, which appears above the stage (WINDOW > Timeline):

Flash movies begin as a single frame. To add movement, you must create additional frames. Frames are added via the INSERT>Timeline... submenu. But because it's such a common thing to do, you need to learn the keyboard shortcuts for adding and deleting frames, so those shortcuts will be refered to throughout this course, versus the INSERT menu method.
Selecting Frames
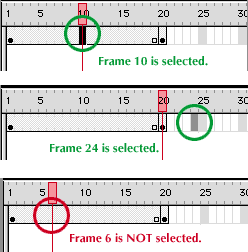
A selected frame will appear either black or dark gray (depending on whether the movie length encompasses that frame). Merely moving the Playback Head, or clicking the frame number in the numberline does NOT select the frame:

Shape Tweening
Shape tweening is often referred to as "morphing." It's when the contour of artwork changes, like the smiley face below:
As there are two main states of the face in this animation, only two keyframes are required: one in which the face is smiling, and one in which it is frowning. Flash will generate the 'tweened' frames.
Creating the shape tween:
- In a new Flash document, change the name of Layer 1 to "Head"
by double-clicking the name of the layer at the left end of the Timeline.
- Draw a yellow circle in the middle of the stage (it doesn't matter whether it's a Shape, a Drawing Object or an Oval Primitive).
- Lock the layer, so you can't change its art (click the dot
under the padlock on the Layer list).
- Add a new layer named "Face." Make sure the Face layer is
above the Head layer, so the facial features appear in front of your
circle (you can drag layers vertically in the layer list, just like rearranging layers in Photoshop).
- On the "Face" layer, draw two black ovals for eyes (to ensure they eyes are the same size, you could draw one, then OPTOIN-drag it with the Select tool —PC users ALT-drag).
- Use the Pencil tool (set to the Pencil mode to 'Smooth' at the base of the Toolbox) to draw the smile
(keep it simple—a single line!).
- Select frame 30 of the Face layer in the Timeline (don't click the
NUMBER thirty; click below it; that's the actual frame 30 of the Face
layer; note each layer has its own frame 30!).
- Insert a keyframe (press F6).
- Your circle disappeared because it is on the Head layer, which has
no frames beyond frame 1. Add a normal frame at frame 30 by clicking
frame 30 of the Head layer, and pressing F5. [the reason you add a
normal frame here instead of a keyframe is that the Head is not changing
in this animation; only the facial features change].
Key Concept:
A regular frame is simply the continuation of contents from the previous keyframe. A keyframe is the appearance of new (or modified) artwork. It's a key moment in the animation when something changes. (The beginning of every layer is a keyframe, but the end of a layer may not be.) - Back on the Face layer, in frame 30, reshape the eyes and mouth with
the Arrow tool (do not select the shapes; simply move the Arrow close
to them, and drag to reshape). Make the mouth and eyes look as they
do when frowning in the sample movie above.
- Select any frame between keyframes 1 and 10 of the Face layer (don't click up in the numberline above the layer; click in the Face layer between the two keyframes) and
choose INSERT > Shape Tween.
- Drag the red Playback Head (it's above the Timeline, in the numbered section) to frame 1, and press RETURN to preview the movie. Save your file as "smiley.fla".
Shape Hints
Sometimes Flash gets confused when shape tweening multiple shapes on a single layer. If your Smiley Face morph looks like the following, you could correct it with Shape Hints:
- Select frame 1 of the Face layer, and choose MODIFY>Shape>Add
Shape Hint.
- In the VIEW menu, ensure Snap to Object is active.
- Drag the Shape hint (the red circle with the "a" in it)
to one end of the mouth.
- In frame 30, move the corresponding Shape Hint to the same side of
the mouth (it should likewise snap to the object, and turn green).
- If this does not correct the tween, you can add up to 25 more shape hints (always add them in the first keyframe of a tween, and remember to move the hints in the second keyframe to the corresponding shapes).
Motion Tweening
The other type of tweening is the motion tween. It is far more common, less memory intensive, and can only be done to symbols that are alone on a layer. Motion tweens do not involve morphing, although they can involve scaling and even fading:
Motion tweens also require keyframes at the beginning and end of the animation (however you don't add the second keyframe until AFTER you make the tween).
To create a motion tween:
- In a new Flash file, draw a small circle at the left side of the stage.
- With the circle selected (including the stroke, if it has one) choose
MODIFY > Convert to Symbol, and select the 'Movie Clip' type of symbol (Symbols will be discussed in detail in the next lesson; for now, think of a Symbol as a special kind of group).
- Select frame 1 and choose INSERT > Motion tween. The default length of a motion tween is 1 second (24 frames if you have not changed the default frame rate). You can drag the right end of the blue frames to extend or shorten the duration of the motion tween.
- Select the last frame of the motion tween. With the Select tool, drag the circle to the right side of the stage (changing something like position in a motion tween creates a "property keyframe" in the last frame of the tween—indicated by a small diamond in the timeline). It also displays a spline (rhymes with "wine") connecting the starting and ending positions (the dots on the spline indicate the position of the art in each frame of the tween).
- Press ENTER to preview the movie.
Once a tween has been inserted, you can manipulate artwork in either keyframe, and the change(s) will be carried through the entire tween.
- In frame 1, scale the circle to 200% (use the Transform panel).
- Press Enter to preview the revised movie.
- You can reposition the entire tween by selecting the Spline with the Selection tool and dragging (this moves the art in both the starting and ending positions; be sure to click and release on the Spline before moving your mouse, otherwise you will bend the spline—but that's how you animate curved movement).
You do not have to save this file.
Frame-by-Frame animation
The least common (and most tedious) way of animating is frame-by-frame. This is analogous to the "traditional" way of illustrating each and every frame (in Flash, it is a series of keyframes). This is more memory-intensive than tweening, and harder to edit after the fact, and should be avoided when possible. Exception: when you want something to move extremely fast, two or three frames might be better than a tween. For example, something moving left to right across the screen could be done simply by placing the object at the left in frame 1, the middle in frame 2, and at the right in frame 3.