Interface Elements
The calculator in the previous exercise is a simple illustration of Flash's fundamental strength: the ability to create a custom interface. Standard online calculators appear with numeric keypads, but these are redundant—most people use the keyboard's keypad, not the one onscreen. Additionally, your Flash calculator can do something traditional ones cannot: perform other mathematic operations on the same two operands without re-entering them.
You can also create standard user interface elements such as check-boxes, drop-down menus, draggable windows, and scrollbars.
A CheckBox
To create a simple checkbox, you could use a 2-frame movie clip, where frame 1 contains an unchecked box, and frame 2 contains a checked box. This box is actually a button: in frame 1 it sends the movie to frame 2; in frame 2 it send the movie back to frame 1 (this is a simple toggle control: jumping a 2-frame movie clip between its frames):
Clicking the square button in frame 2 of the movie clip sends the clip back to frame 1 (so if the square button instances are perfectly aligned from frame to frame, the only difference is the addition of the checkmark art in frame 2, and the user would have the sense of checking and un-checking the square (try it: )
Code comments
ActionScripts can be quite lengthy and hard to comprehend, so it is good practice to comment your code, as will be done in the following checkbox example. Commenting is done by typing two slashes at the beginning of a line:
//here is a single-line comment
or by starting a comment with /* and ending it with */:
/* here is a longer multi-line comment
(a.k.a. a block comment)that might be
required to provide some depth to an
explanation for a section of code*/
I strongly encourage commenting your code: it helps you find relevant sections, helps you remember what functionality certian parts of the script provides, provides a degree of documentation for others who may work on the application, and can be used for troubleshooting (you can comment out sections you suspect may be causing a bug instead of deleting them; if they are not the source of the bug, just un-comment them). The easiest way to comment code is to hilight it, and press either of the Comment buttons at the top of the Actions panel:![]() (inexplicably removed in Flash CC)
(inexplicably removed in Flash CC)
To create the checkbox:
- In a new Flash file, create a button symbol named “Box”.
- In the Up frame, draw a square stroked with black and filled with white.
- Create a new movie clip symbol named “Check”.
- In frame 1 of the check symbol, draw a red check mark using the Brush tool
- Create a new movie clip named “CheckBox”
- In frame 1 of the CheckBox movie, place an instance of the Box button on the stage, and give it the instance name “tickBTN”
- Add the following ActionScript to frame 1 of the CheckBox movie:
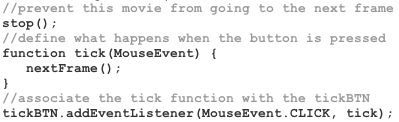
- OPTION-drag (PC users ALT-drag) keyframe 1 to frame 2 of the timeline (this duplicates the ActionScript as well as the frame contents).
- Change the unstance name of the button to “untickBTN”.
- Add an instance of the Check symbol on top of the button (this Check instance does not need a name since it will not be controlled).
- Edit the ActionScript on keyframe 2 of the timeline to reflect the highlighted changes:

- Return to Scene 1 of the main timeline, and place an instance of the CheckBox movie clip onstage.
- Test the movie (CONTROL > Test Movie) and click the button.
Drop-down Menus
Creating a menu-driven interface is actually very simple and involves little more than creating a button:
To create a drop-down menu:
- In a new document, create a symbol with button behavior named “Menu item”.
- In the “up” frame of the Menu Item button, draw a rectangle the color you want your pull-down menu to be, stroked with black.
- Add a keyframe to the “Over” frame, and fill the rectangle with a highlight color.
- Add a keyframe to the “Down” frame, and change the fill to a darker color.
- Create a new Movie Clip symbol called “drop-down” (when you do this, you will find yourself inside this new timeline; DO NOT return to Scene 1 until step 18 below!).
- Drag an instance of the Menu Item button to the center point on the stage, and assign it the instance name “menuBTN”.
- Type “Cool Flash Sites” on top of the button (as pictured above).
- Add a keyframe at frame 2. Place another Menu Item button against the bottom edge of the original. You may stretch it wider using the Free Transform tool (make sure it can accommodate a “WaterLife.com” label). Name this button “item1BTN” (note that instance names may not begin with a number!)
- Option-drag (PC users Alt-drag) it down to duplicate it. Place the duplicate so there’s no space between it and the original, and change its instance name to “item2BTN”.
- Repeat the preceding step to create the third button named “item3BTN”.
- Option-drag “Cool Flash Sites” straight down on top of the item1BTN. Edit the text to read “WaterLife.com”.
- Repeat twice, writing “ecodazoo.com” and “Ocean Recon” on the item2BTN and item3BTN instances (as pictured above, when you click the Cool Flash Sites menu).
- Add a new layer and name it “Actions”.
- Open the Actions panel (WINDOW > Actions).
- Enter the following script in frame 1 of the Actions layer:
stop();
function openMenu(MouseEvent) {
nextFrame();
}
menuBTN.addEventListener(MouseEvent.CLICK, openMenu); - Option-drag (PC users ALT-drag) keyframe 1 of the Actions layer to frame 2 of the Actions layer (this carries the script with it and will save you some typing).
- Edit the script in frame 2 to read:
function closeMenu(MouseEvent) {
prevFrame();
}
menuBTN.addEventListener(MouseEvent.CLICK, closeMenu); - Return to Scene 1 and drag an instance of the Drop-down movie clip from the library to the top of the stage.
When you test this movie, you can open and close the menu once, but then it stops working. This is due to conflicting event listeners (the menuBTN has had two event listeners attached, so it is executing both the openMenu and the closeMenu functions each time you click the button).
There are two solutions:
A) change the instance name of the menuBTN in frame 2 (along with the ActionScript to reference this new instance name)
B) remove one event listener whenever you attach another.
We’ll use the second solution, as it’s more versatile, and illustrates the best practice in ActionScripting (controlling your event listeners, rather than hacking instance names):
- Add the following line of code to the beginning of the ActionScript in frame 1:
menuBTN.removeEventListener(MouseEvent.CLICK, closeMenu); - Add the following to the beginning of the ActionScript in frame 2:
menuBTN.removeEventListener(MouseEvent.CLICK, openMenu); - Add the following to the end of the ActionScript in frame 2:
//get urls
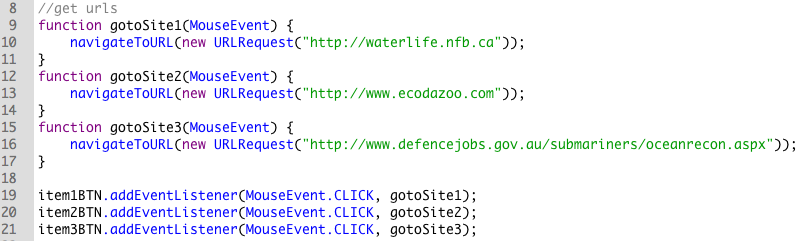
The basic functionality of a drop-down menu is now present. Choosing any of the URLs in the menu opens the default browser, and loads the URL specified on each button. However the only way to close the menu is to click its title. This is bad usability. Normal menus close when you roll outside the menu without choosing any option, or when you click outside the menu. In the next process you will add either functionality to your menu, using an invisible button placed in frame 2 of the movie clip (in the menu’s open state):
- Create a new button symbol named Invisible Button.
- Insert a keyframe in the Hit frame of the timeline.
- Draw a filled rectangle (size, stroke and color don’t matter).
- Double-click the Drop-down clip in the Library (or select it from the Edit Symbols menu to the left of the view increment field at the top right of the stage).
- On layer 1 of frame 2, place an instance of the invisible button on top of the whole open menu. Size it so it is larger than the whole menu.
NOTE: invisible elements always display bright blue in the authoring environment—they will not show at runtime. - Give this invisible button the instance name “invisibleBTN”
- With the Invisible button instance selected, choose MODIFY > Arrange > Send to Back.
- Add the following to the ActionScript in frame 2:
invisibleBTN.addEventListener(MouseEvent.MOUSE_OVER, closeMenu);
- Test the movie (Command-Return on a Mac; CTRL-Enter on a PC).
To make the menu “sticky” (remain open after rolling outside it, and only close after clicking), use the “MouseEvent.CLICK” parameter in step 28 and size the invisible button to cover the entire stage.