Transforming artwork
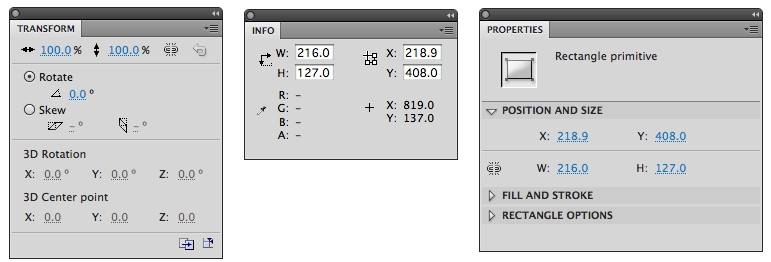
You can precisely transform selected artwork (whether or not it is grouped) using the Transform panel, the Info panel, or the Properties panel (all found in the WINDOW menu):

You can also transform selected artwork with the Free Transform tool (shown below with envelope distortion option):

And finally, you can choose from several transformation options under MODIFY > Transform....
Drawing a 3D cube:

- In a new Flash file, select the Rectangle tool.
- Be sure Object Drawing mode is enabled (check the bottom of the Toolbox).
- Use the Properties panel to set the Fill to red, and the Stroke to a 2pt black stroke.
- Hold SHIFT as you draw a rectangle in the middle of your stage (SHIFT makes it a perfect square).
- If you need to change the fill color, choose the Paintbucket tool
 ,
and set its option to the color you prefer, and click in the middle of your
square (if the shape was selected, changing the color on the Toolbox already changed the square).
If you wish to change the stroke weight or color, select the Ink Bottle tool , and set
its options before clicking your square.
 - Click the square with the Selection tool. To make it exactly 1" wide and tall* use the Properties panel to set both the width and height to
72 pixels.
*NOTE: computers ignore the actual monitor resolution when converting pixels to inches, so a 72-pixel square will display anywhere from 0.6" to 3" onscreen, depending on the system, monitor, and user-defined display resolution. The moral of the story: there's no such thing as an "inch" online!
- Option (Alt)-drag your square to the right (holding the Option key [Alt on a PC] duplicates the artwork as you drag). Place this duplicate square right next to the original, so the sides touch (you can nudge selected artwork using the Arrow keys on the keyboard).
- Option(Alt)-drag the original square up, until you get a duplicate above, but touching the original (see positioning in Fig. 1, above).
- Select the top square, and click the Free Transform tool.
- Place the cursor just above the top edge of the top square (the cursor should
look like a pair of parallel arrows) and drag to the right to skew it (see
Fig. 2).
- Select the Right-most square with the Free Transform tool.
- Drag just outside the RIGHT edge to skew it upward (your illustration should
now look similar to Fig. 3).
- Select all three surfaces of the "cube" either by marqueeing
them with the Selection tool or Lasso tool, or clicking one shape with the Select tool, then
SHIFT-clicking the other two.
- Choose MODIFY > Break Apart (this turns the drawing objects into shapes).
- Use the Selection tool to marquee the front of the "cube" (start
below and to the left, so you can end your marquee in the center of the
corner created by the two touching skewed shapes (see Fig. 4).
- Drag the selected area away from the back part of the "cube".
- Lasso and delete the leftover back of the cube.
- Use the Ink Bottle tool to replace the stroke on the back two edges of the cube, and use the Paintbucket tool to slightly change the colors of the top and side surfaces of the cube.
- Select all parts of the cube and choose MODIFY > Group (you cannot change shapes back into drawing objects; grouping is the next best thing).
- Save your work.
Flash file formats
A Flash authoring file is saved in the .FLA format. This is analagous to Photoshop's .PSD format: it's a metafile that only the Flash IDE can open. To put it on the web, you'll compile it into a compressed format (.SWF), much like you must turn a .PSD into a .JPG before using it on your website. And just like you do not open and edit .JPGs (you edit the .PSD, then re-export as a .JPG), you do not edit .SWF files: you regenerate them from the original .FLA. Always archive your original .FLA files!